The beginner's guide to fine-tuning Stable Diffusion

An all too common story: you’ve started using Stable Diffusion locally (or perhaps online) and the images you’re generating just aren’t that good. That’s because to get really good results, you’re likely going to need to fine tune Stable Diffusion to more closely match what you’re trying to do. This post is going to walk through what fine tuning is, how it works, and most importantly, how you can (practically) use it to generate better and more customized images.
What fine-tuning is, and why models aren't perfect out of the box
I thought it would be funny to generate an image of Thanos wearing a suit at a fancy dinner. So I prompted Stable Diffusion (the out-of-the-box model). Here’s what I got:
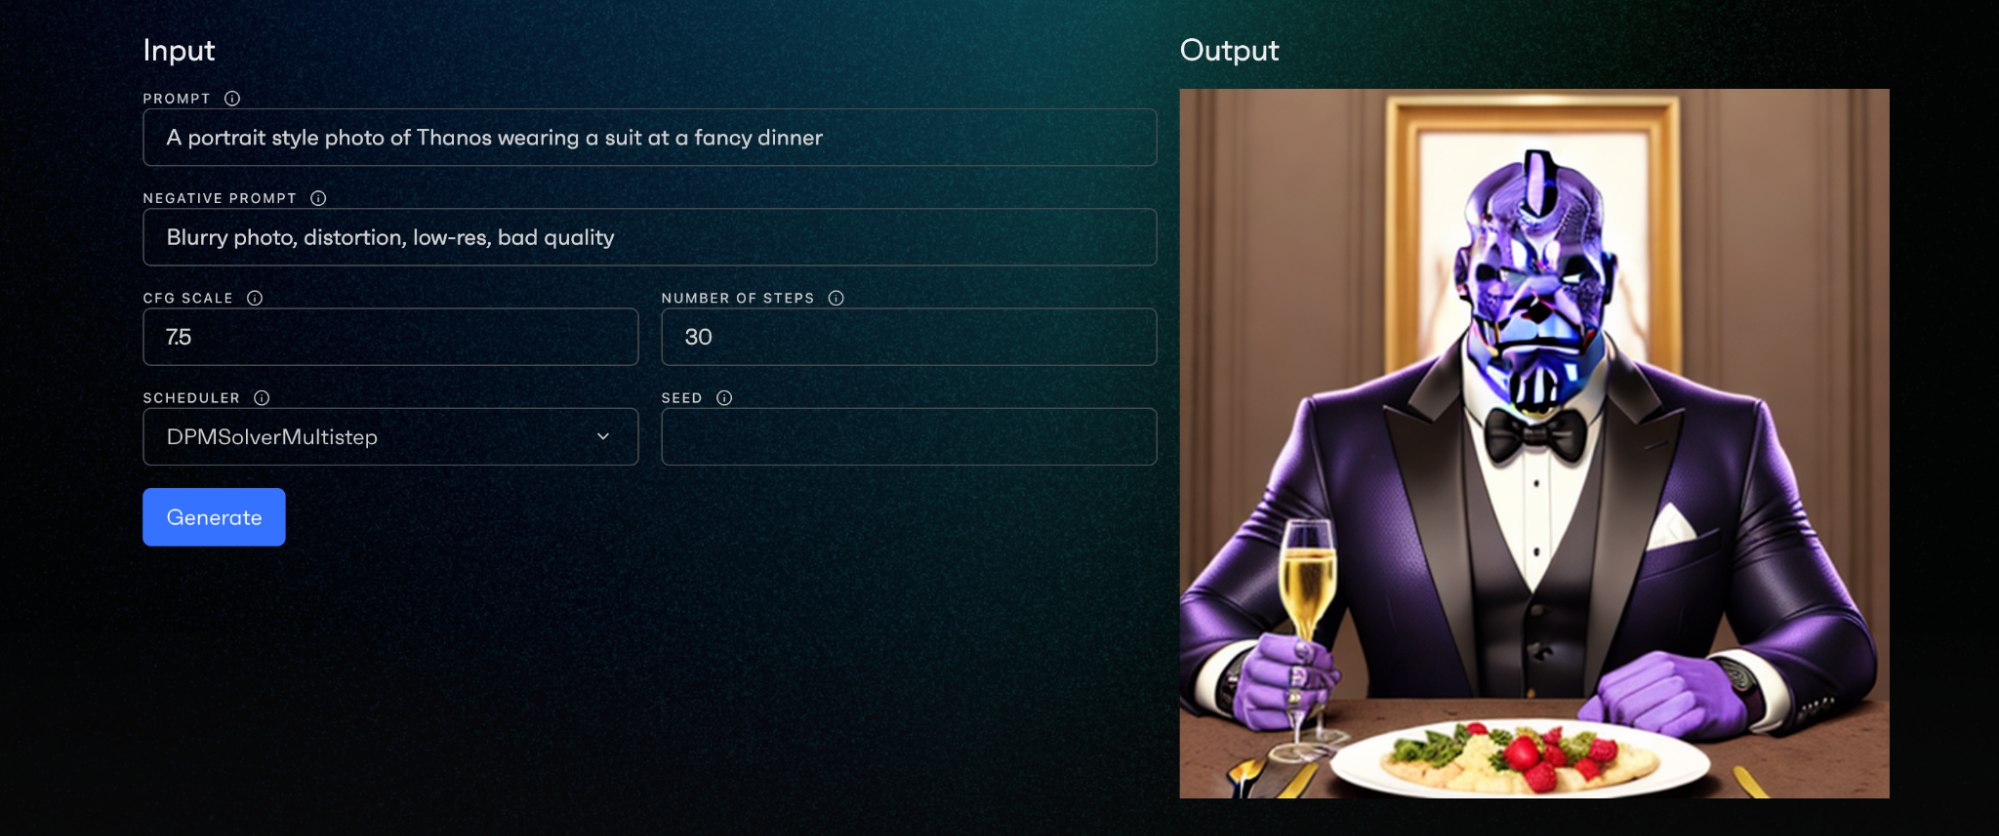
Things took a comic book turn when I ran this locally using A1111:

Directionally correct, yes, but definitely not something high quality enough to use commercially. In the first photo, the suit, food, and champagne are pretty well done, but the face is all messed up. In the second, the body is misshapen and there’s nonsensical text in bubbles. What I was looking for was something a lot closer to this:

This is kind of the norm when you’re prompting Stable Diffusion from scratch – the model will generate something that at least thematically matches the prompt, but individual faces and attributes will be blurry, obscured, or even worse, weird. The reason for this is pretty simple: models like Stable Diffusion are trained on giant corpuses of text-image pairs, and synthesizing subjects (like Thanos) in novel environments (wearing a suit at a fancy party) requires a depth of expression that these models just don’t have. To quote the DreamBooth (more on this later) paper:
While the synthesis capabilities of these models are unprecedented, they lack the ability to mimic the appearance of subjects in a given reference set, and synthesize novel renditions of the same subjects in different contexts. The main reason is that the expressiveness of their output domain is limited; even the most detailed textual description of an object may yield instances with different appearances. Furthermore, even models whose text embedding lies in a shared language-vision space cannot accurately reconstruct the appearance of given subjects but only create variations of the image content.
What fine tuning allows us to do is augment the model to specifically get good at generating images of something in particular. In essence, we’d take Stable Diffusion and make it Thanos Stable Diffusion. Or Stable Dithanos.
The way we do that is by providing the model with a set of reference images of the subject (Thanos) that we’re trying to synthesize images of. The model learns to associate a specific word (or technically, an embedding) with that subject. Then, when you prompt the model, it's able to maintain the fidelity of the subject while still changing the background and style.
Logistically, there are a bunch of ways to do this. We’ll run through the popular ones and how you can get started with them yourself.
DreamBooth: adjusting existing model weights
DreamBooth came out of Google Research in March as a way to fine tune Stable Diffusion to generate a subject in different environments and styles. You can read the original paper here. Here’s how it works:
You provide a set of reference images to your subject (Thanos)
You retrain the model to learn to associate that subject with a specific word (let's say "thnos")
You prompt the new model using the special word
With DreamBooth, you’re training an entirely new version of Stable Diffusion, so in practice that’s going to be a model checkpoint. In the Stable Diffusion context, a checkpoint is basically an entirely self-sufficient version of a model; and that means it’s going to take up a bunch of space (usually 2GB+).
You can use DreamBooth tuning yourself if you’re comfortable with Diffusers or Kohya, but it’s a lot easier to use an existing checkpoint from a repository like Civitai. To get started, head over to Civitai, and create your account (it’s free). Click on the filter icon to the right of your screen, and select “checkpoint” to filter for checkpoints.
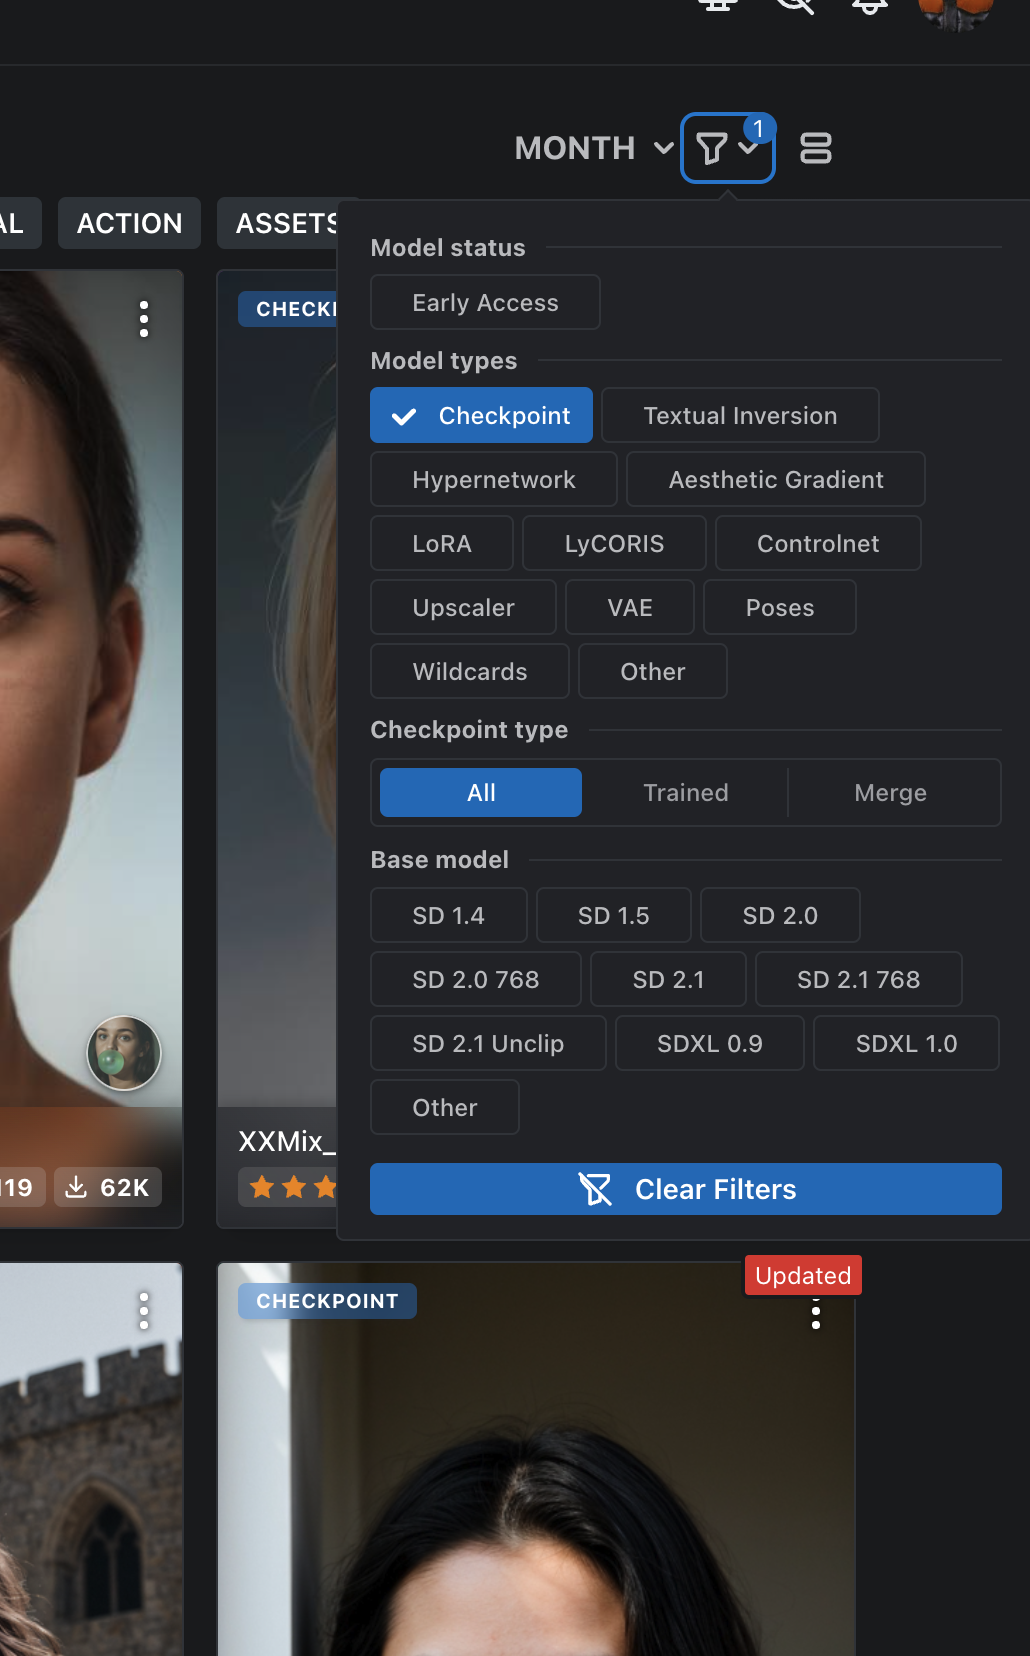
I found a checkpoint I like from a user named DucHaiten that looks like Toy Story characters (to me). This is a style checkpoint, which means it’s going to generate images in a particular kind of style (so no special prompt keyword). To use it, click on the model, and then click on the “download” button on the right of your screen. Since this is a checkpoint, it’s sizable (2.24GB) so you’ll want to keep an eye on how many of these you’re downloading to your local machine.
To use my downloaded checkpoint, I’m using the Automatic1111 Stable Diffusion WebUI, running locally on my Macbook Pro. You’ll need to take that downloaded checkpoint and drop into /models/Stable-diffusion. Click the refresh icon in A1111 and you should see the checkpoint show up there.
When using checkpoints off the web, you need to make sure to mimic the provided settings exactly. For any of the provided example images on the model page, clicking the “i” icon will give you a modal with the exact settings for the prompt that created the image.
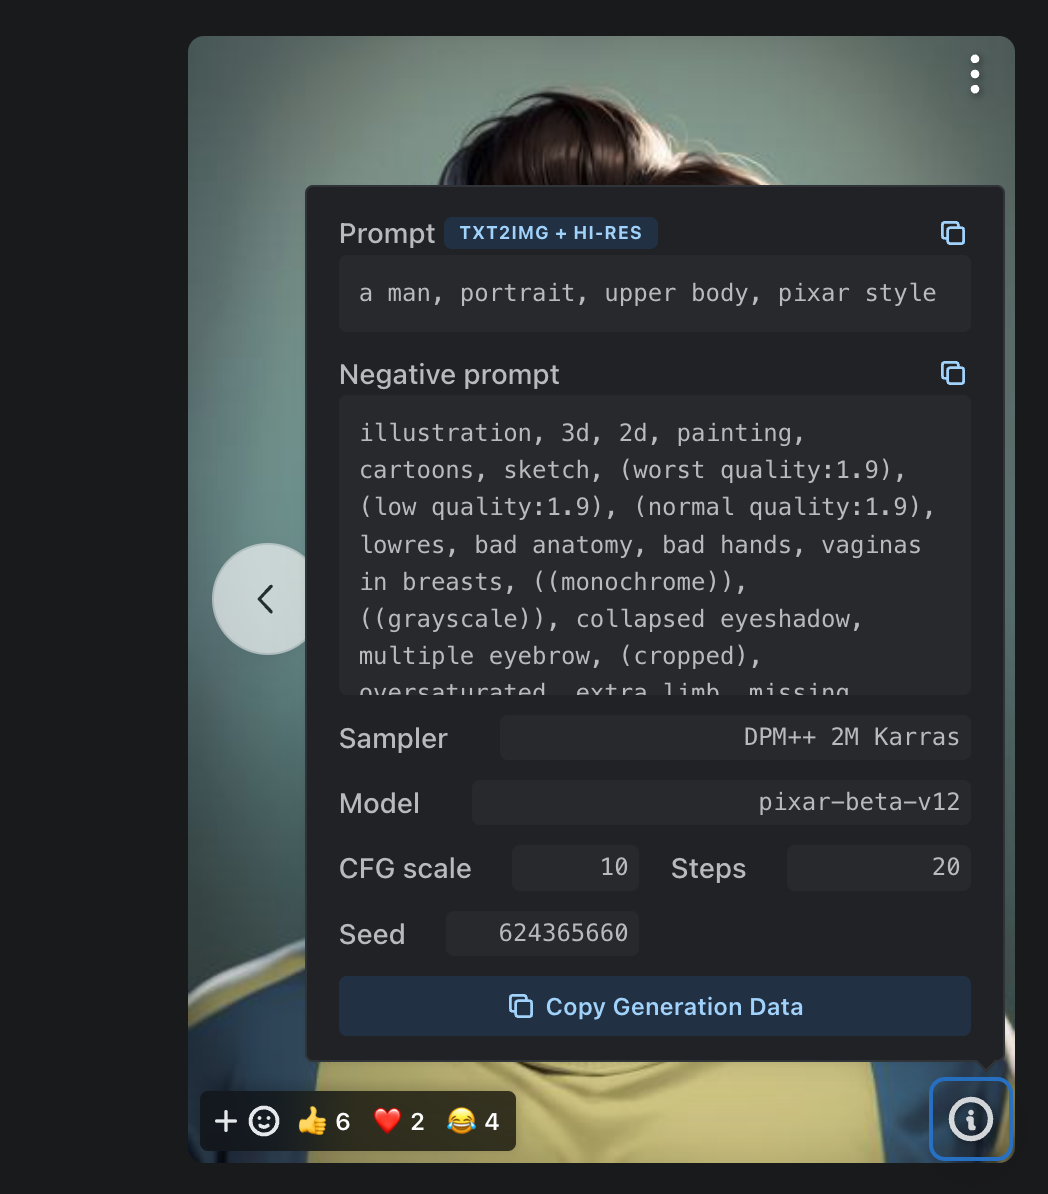
After adjusting the prompt, sampler, CFG scale, steps, and seed, we’ve got ourselves a pretty nifty Pixar-style image of Thanos:

And that’s Dreambooth!
A cool thing about checkpoints, by the way: you can merge them. If we wanted to combine this 3D Pixar style checkpoint with a photorealistic checkpoint, you can do that in the A1111 UI:
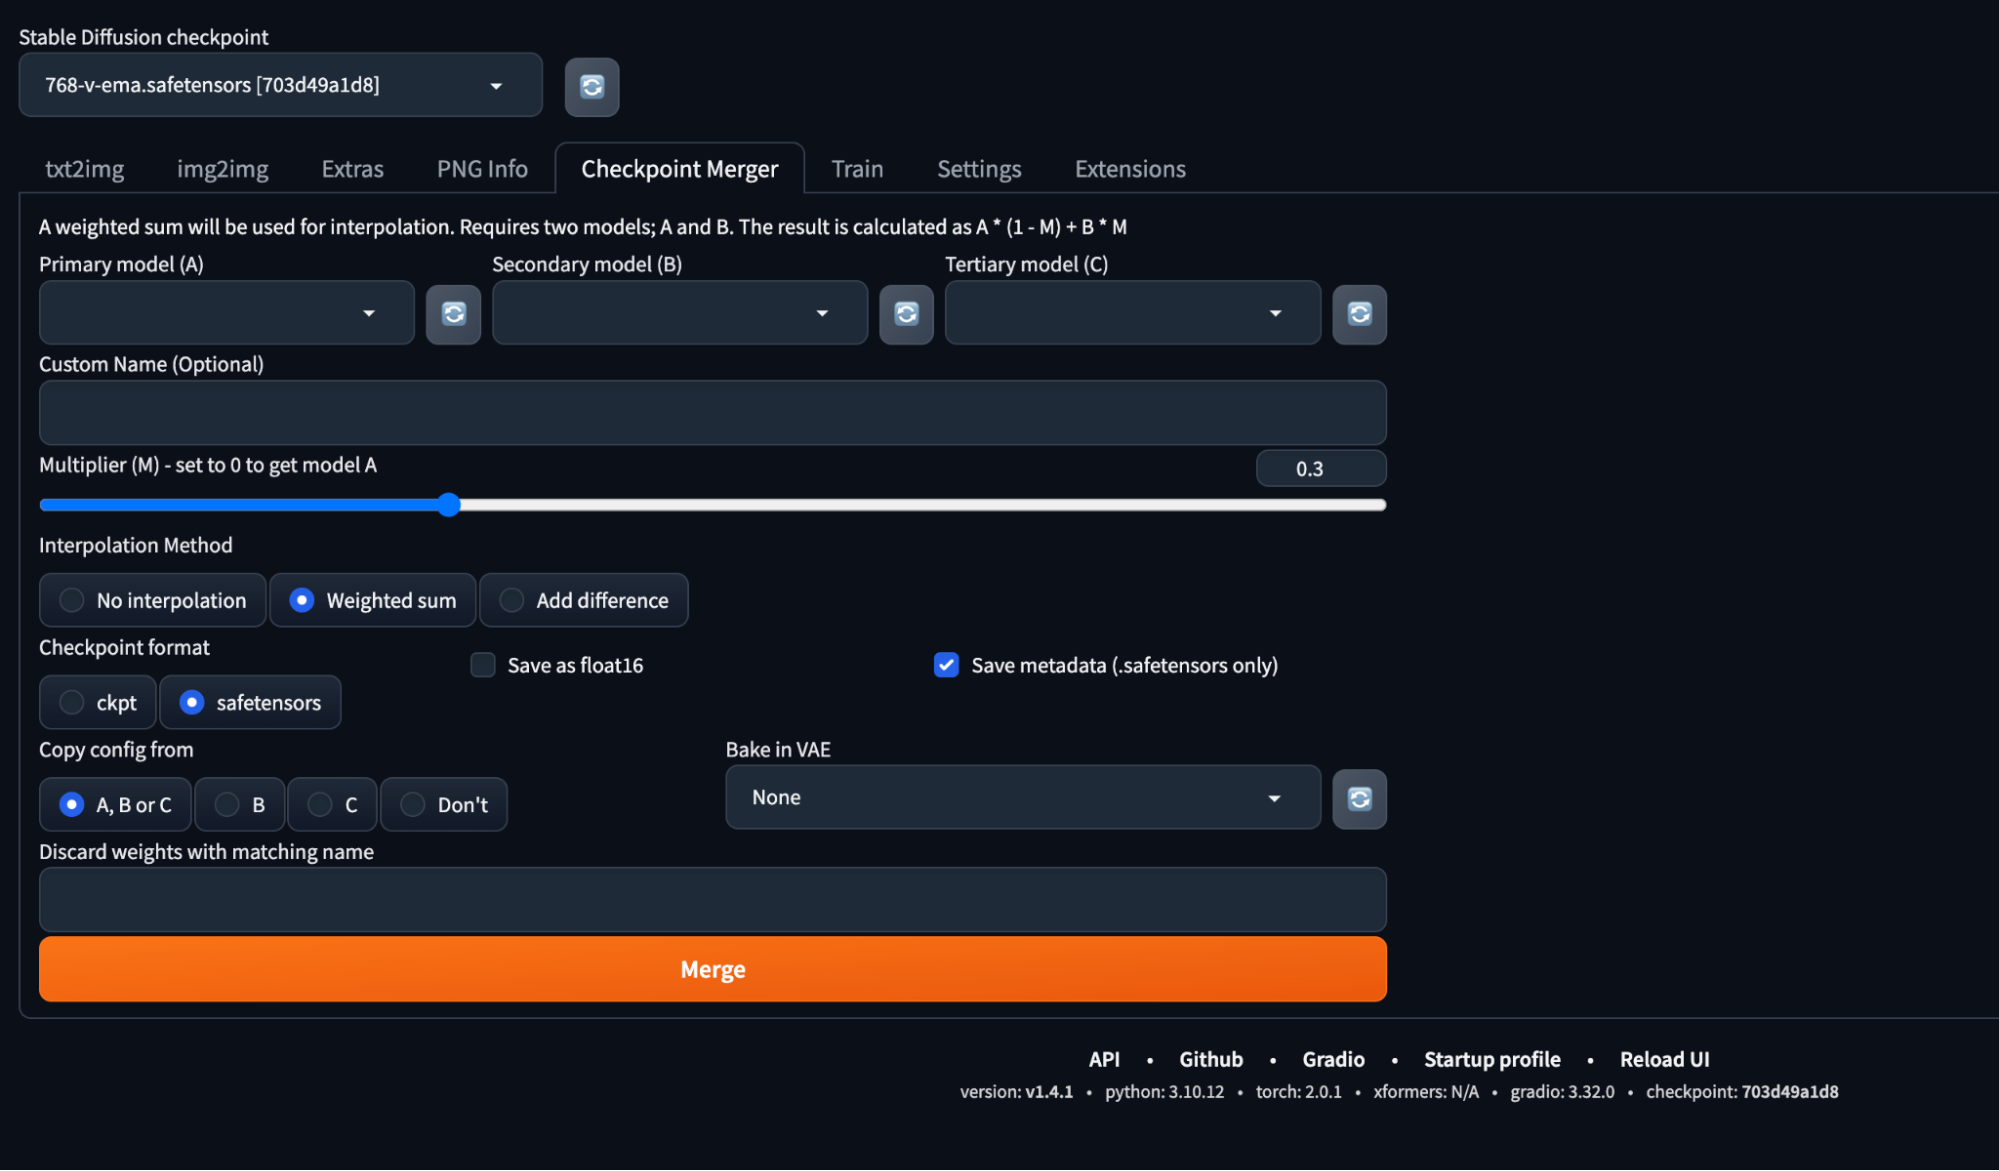
Checkpoint mergers can be a bit unpredictable, so you’ll need to experiment.
Textual Inversion: working backwards
Dreambooth can yield pretty powerful results, but they come at a cost: size. Downloading an entire checkpoint for every model variation is going to eat up your hard drive fast, requires custom training, and takes a while. Textual Inversion, on the other hand, is pretty fast and easy. What it does is figure out what embeddings your model already associates with the reference images that you provide. Here’s how it works:
You provide a set of reference images of your subject
You figure out what specific embedding the model associates with those images
You prompt the new model using the embedding
Textual Inversion is basically akin to finding a “special word” that gets your model to produce the images that you want.
You can create one yourself using Diffusers, or (like before) find an existing one on Civitai. To get started, head back to the filter icon and select Textual Inversion.
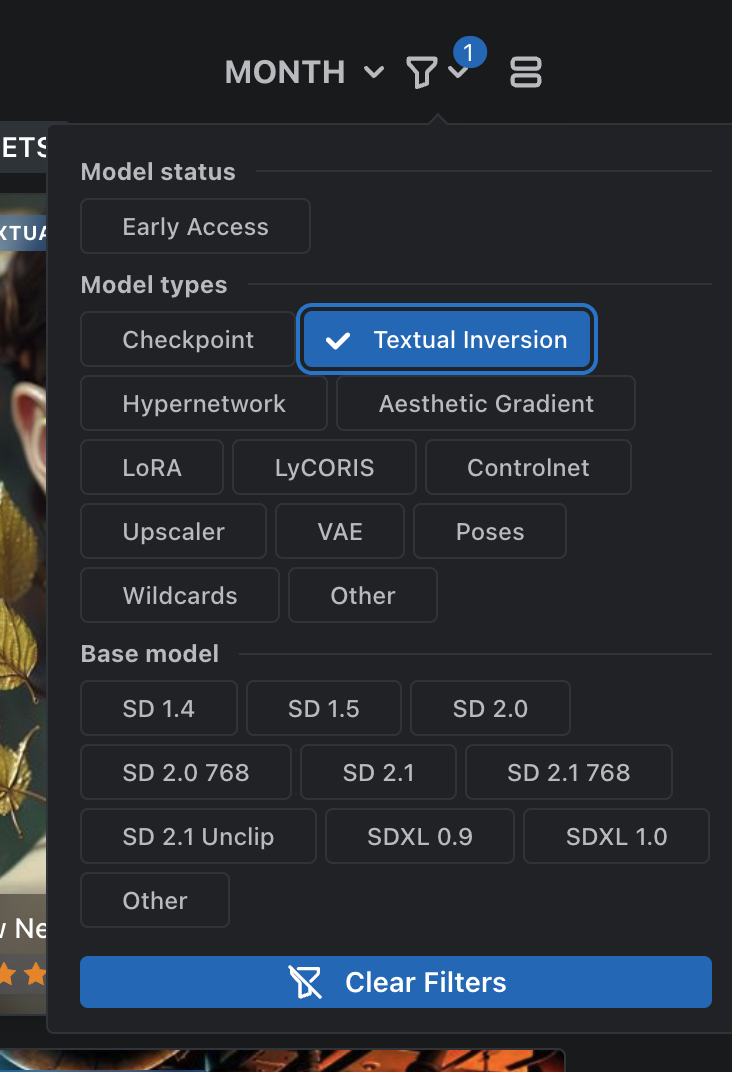
I found one for Danny Trejo because why not (dtrejo5000):
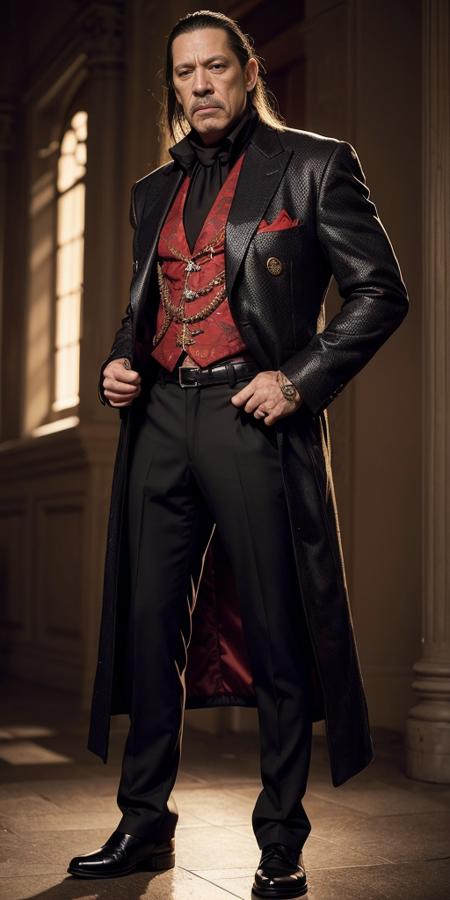
To use this Textual Inversion, you just need to download the embedding using the download button. Note that it’s incredibly small (4KB) unlike the checkpoint in the previous section. You’ll also see a “trigger word,” which is the set of words you’ll need to use in the prompt to associate with the embedding (think of it as the embedding’s “english” counterpart). In our case it’s “(DTtrjo_5000:1.0).”
To use a Textual Inversion in A1111, place the downloaded .bin file in the embeddings directory. From there, you’ll just need to use the trigger word in your prompt. Note that unless you use the exact same model listed in the Civitai prompt, results are going to look a bit different.
LoRA: Dreambooth, but faster and smaller
While Dreambooth trains an entire new model by updating the model’s weights, LoRA takes a different approach: it adds microscopic new weights to the model instead.The method was originally developed for LLMs (Large Language Models like GPT-4), but works well for txt2img models like Stable Diffusion as well. A LoRA is typically in the hundreds of MB range, so somewhere between a Textual Inversion and a Dreambooth checkpoint.
Like Dreambooth and Textual Inversions, you can train a LoRA yourself using Diffusers, Kohya, etc. But you can also snag some sweet LoRAs from the community on Civitai. Just click on the filter icon and select LoRA. I found this LoRA for a photorealistic Thanos (finally!):

Like a Textual Inversion, LoRAs have a trigger word, which in our case is “thnos.” To get started, download the LoRA and put it in the /models/Lora folder in A1111. Clicking on the little portrait icon in A1111 reveals a UI where you can select the LoRA you want to use:
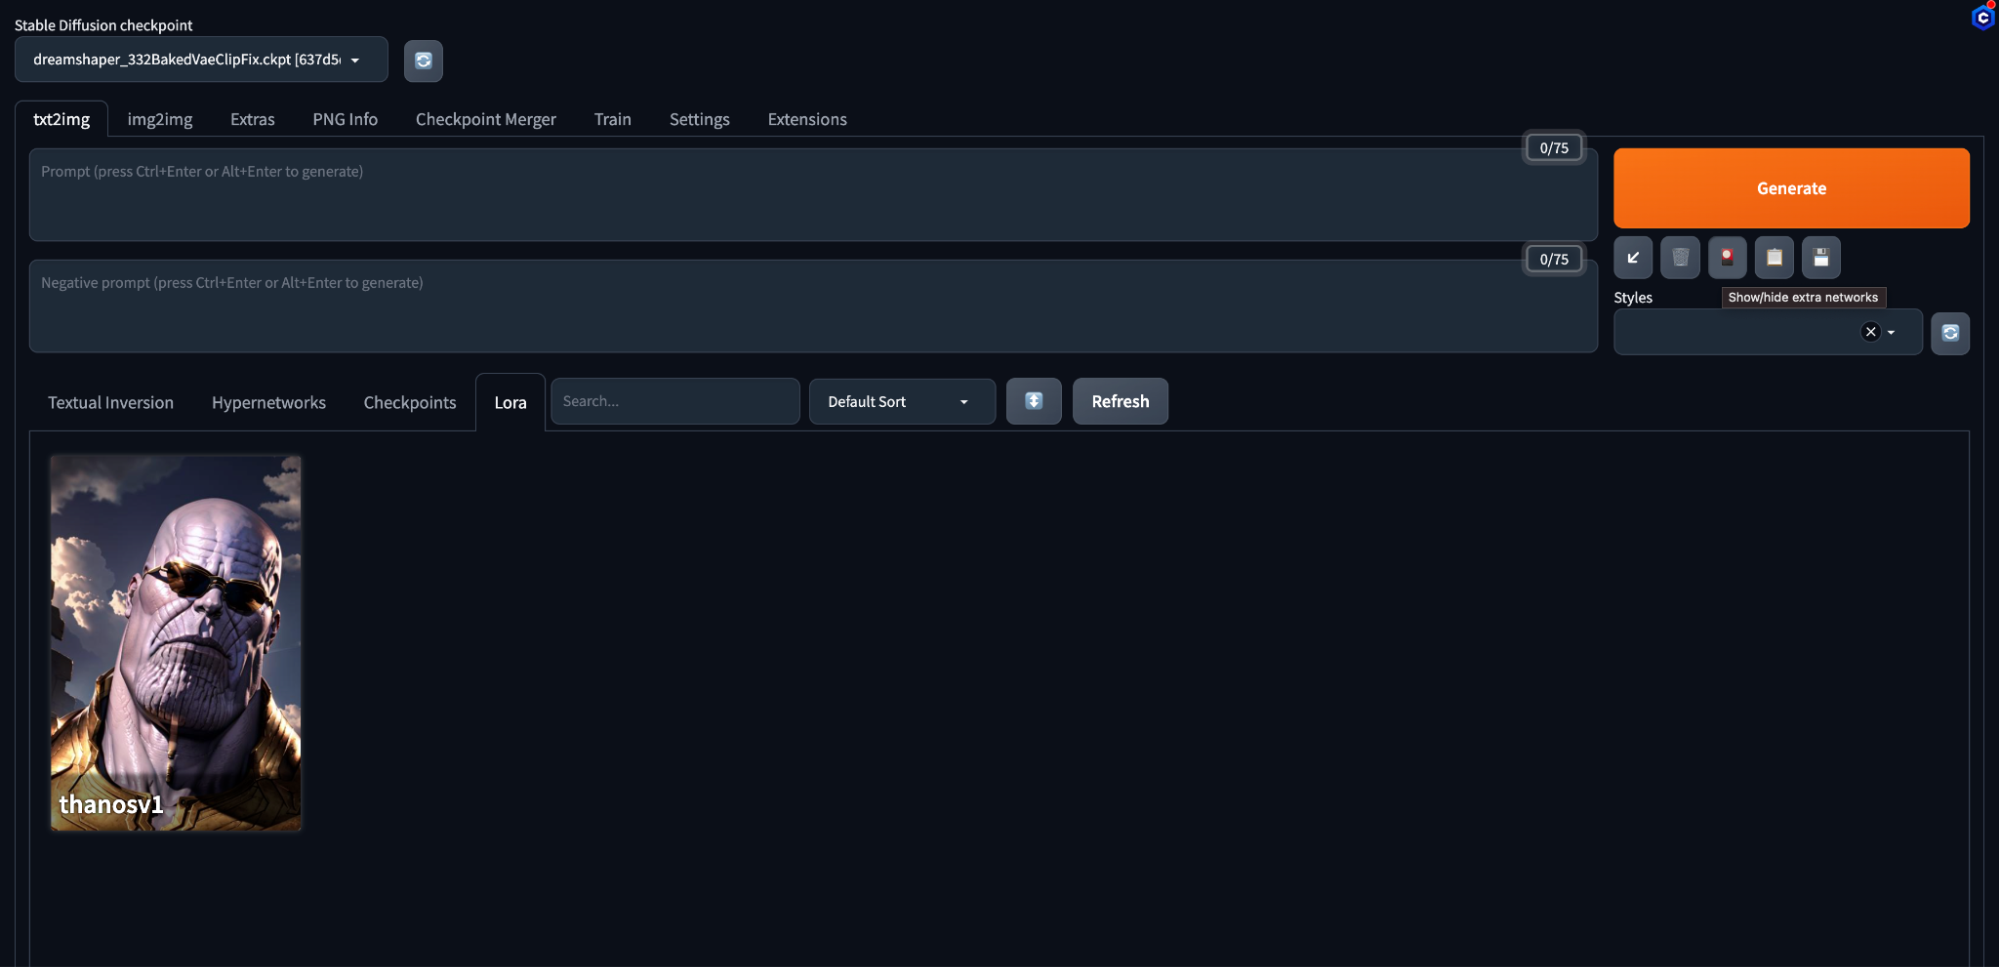
Clicking on that LoRA will insert an identifier into your prompt. The format is
lora:[lora_name]:[weight]The weight determines how much of the LoRA is “applied” to the final result; the Civitai model recommended somewhere from .7-.9. So in our case:
<lora:thanosv1:.9>I found that I also needed to use the trigger word provided on Civitai (“thnos”) to get good results.
I made a bunch of adjustments before returning to the original goal (Thanos in a suit):
I downloaded a different base model to match the one used on Civitai (here)
I adjusted the model settings (CFG, steps, etc.) to match the Civitai settings
I changed the prompt to be more direct
Here were the final settings in Automatic1111:
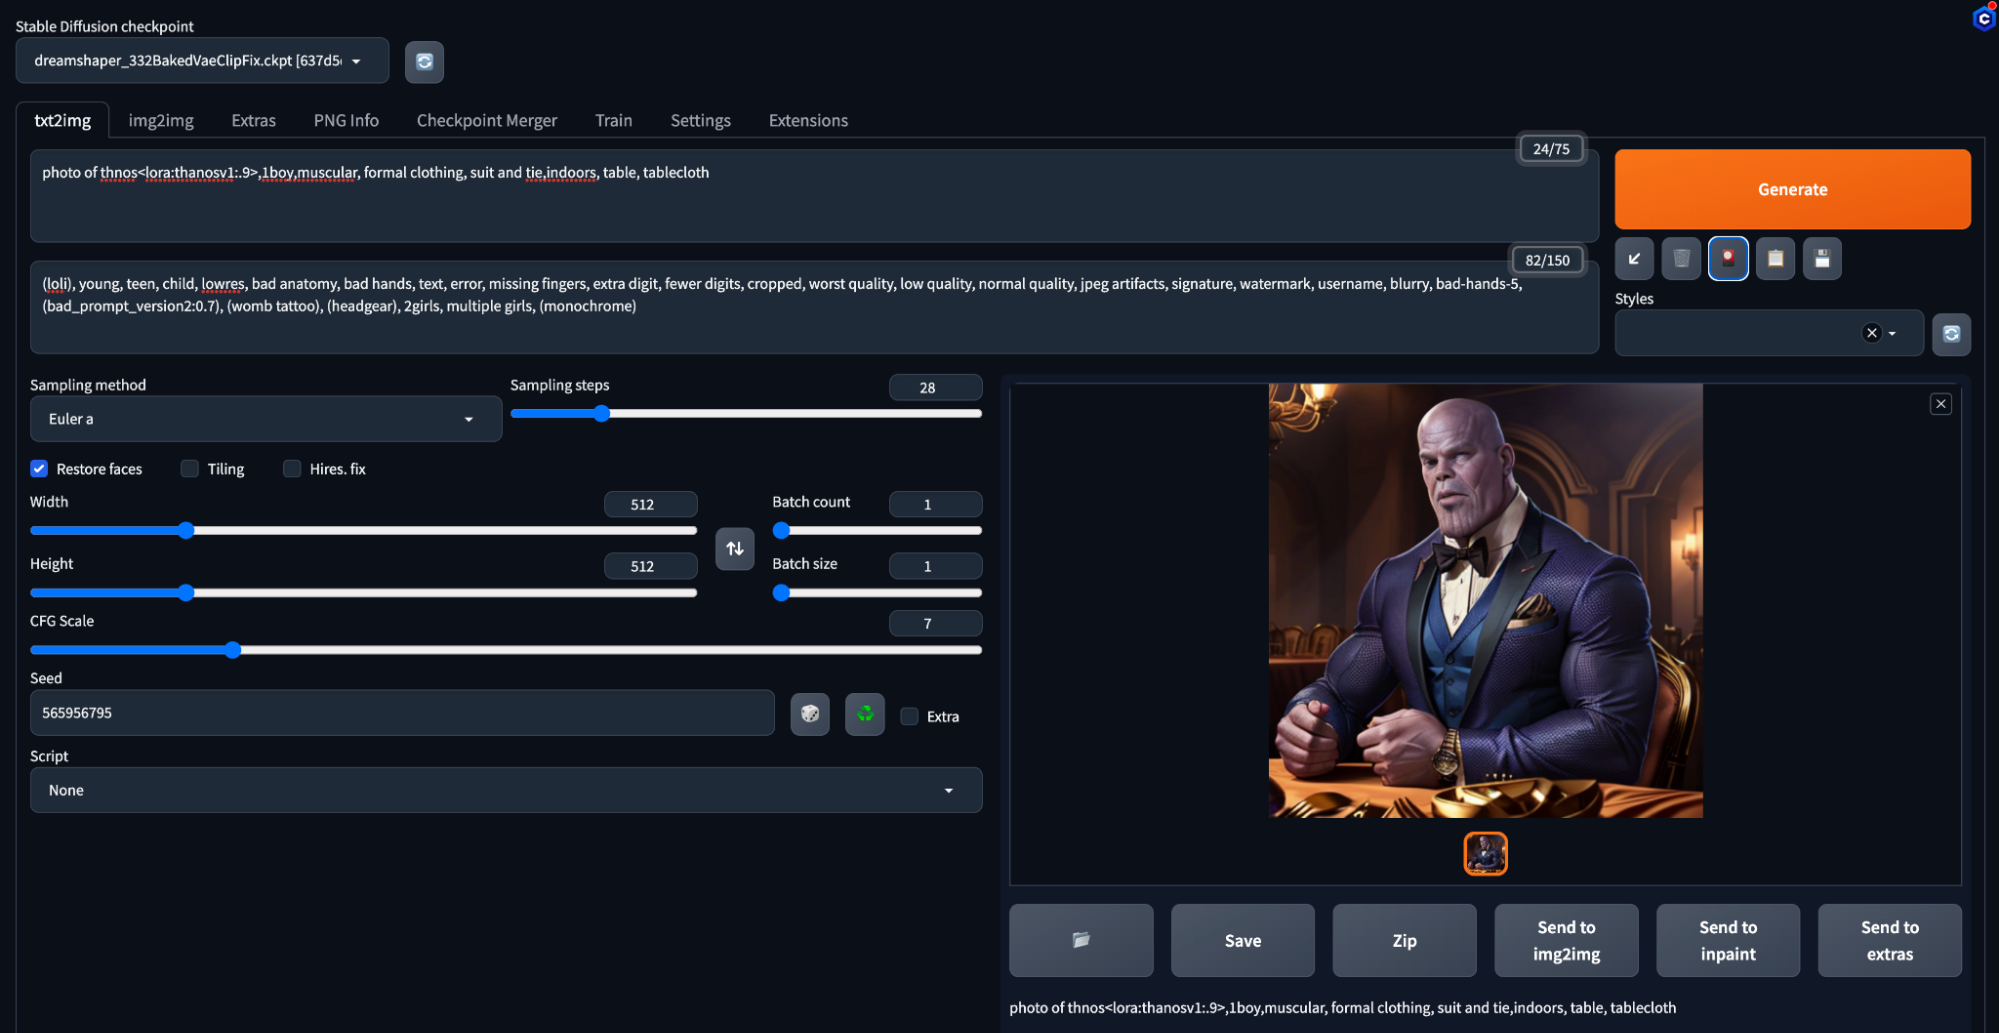
And the final image is really good!

Quick summary
Using Stable Diffusion out of the box won’t get you the results you need; you’ll need to fine tune the model to match your use case. We covered 3 popular methods to do that, focused on images with a subject in a background:
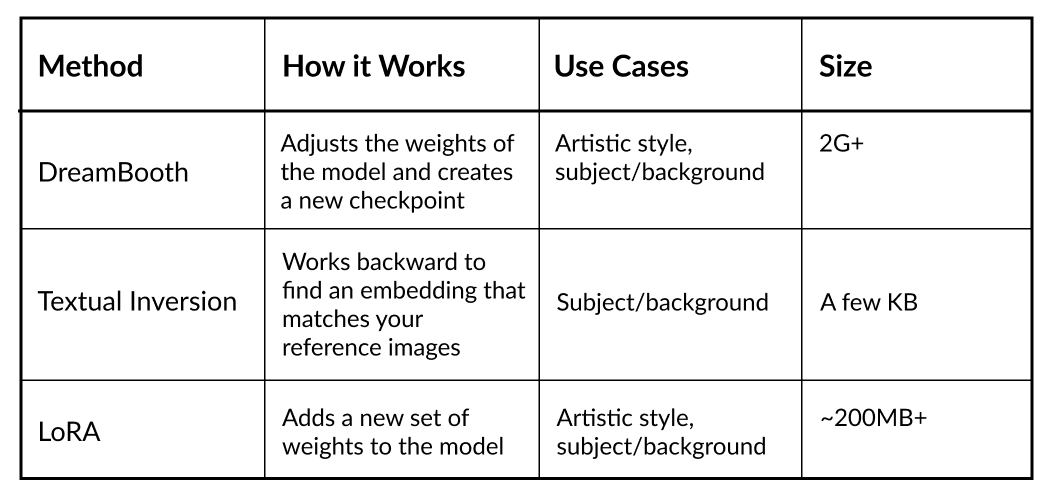
- DreamBooth: adjusts the weights of the model and creates a new checkpoint
- Textual Inversion: works backward to find an embedding that matches your reference images
- LoRA: adds a new set of weights to the model
If you’ve got a highly custom use case, you can run all of these yourself using a combination of Diffusers and PyTorch (or Khoya). But you can just as easily download an existing model, inversion, or LoRA off the web and tinker with it locally or on a model hosting service.
Your choice of models on our SaaS or in your environment
Run any model or checkpoint on our efficient, reliable, and customizable API endpoints. Sign up and start building in minutes.

